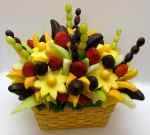
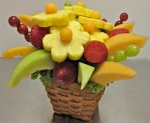
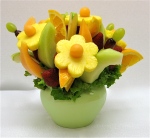
 HOW TO MAKE YOUR OWN EDIBLE ARRAGNEMENT
Not everyone wants to buy an edible fruit arrangement from those of us who make them. Yes, we do have to charge a lot for them, but when you consider the overhead we have have just to operate I think you’d agree that for a once in a while this indulgence it’s really not so bad.
Either way, there are a lot of us out here that just can’t afford or don’t want to pay that kind of price. Yes, I own my own ’boutique fruit arrangement’ store and no, I could not afford the buy my own product if I had to.
But doing it yourself can also be very frustrating and time consuming, particularly if you are an impatient sort, or didn’t reserve enough time to do the project properly. So here are my recommendations on how you can make your own delicious fruit arrangement at home.
 FIRST!! Make sure you have at least two hours of uninterrupted time to do this! How long it takes depends on the size arrangement you decide to create, but two hours should do it for most sizes.
Fruit Options Apples – either grannies or honeycrisps if in season. Gala’s are good too, naval orange, honeydew, cantaloupe, pineapple, seedless grapes, strawberries, firm kiwi, firm pears and maybe plum, even grapefruit. You’ll need 1 to 4 heads of green leaf lettuce, again the quantity depends on the size arrangement you want, and (1) 6 oz can of pineapple juice.
I’d avoid the following fruits because they are delicate and tend to break down, or are too watery to hold up very long in one of these arrangements. AVOID watermelon, mango, pears that are too soft or peaches. I’ve heard of people using star fruit as well as some other exotic fruits, just be sure that they are firm and not soft, and you should be OK.
Tools 10″ or 12″ chefs knife / 6″ paring knife / small melon baller / flower shape cookie cutter / lg. cutting board / small cutting board 6″ x 4″ / a bowl (veggie serving bowl size works, just larger than a soup bowl) 6″, 8″ 10″ and maybe 12″ bamboo skewers / 4″ or 6″ planter or pot cover (or a basket that is not too flimsy, willow or a wood woven works well), and a non-metallic tray to hold cut fruit until ready to assemble. ** Believe it or not, you may also need something from the tool box or junk drawer. An electrical plier/wire snipper/cutter to trim the longer skewers as needed. Scissors typically do not work very well and splinter the ends of the skewers, sabotaging the person who will be eating from it.
Preparation Soak heads of lettuce in cold water to clean and help remove debris from down inside the leaves. DO NOT CUT IT YET! Leave the root on for now, it helps keep the leaves together. Wash all fruit in cold water and be sure exteriors are clean. Oranges sometimes need a brush. Melons should be cleaned on exterior (prior to cutting) with a sanitizer solution. Bleach works well, follow the directions on the bleach bottle for how to dilute it properly. Melons have been known to cause SAMONELLA and make people ill if the exteriors are not cleaned correctly, so if you want to avoid making old Aunt Margaret sick please take the time to do this step! See below for tips on how to clean strawberries. Wash grapes and leave in strainer until ready to thread onto a skewer.
 SETTING UP THE CONTAINER For this step you will need the green leaf lettuce and your container/basket/pot cover & a chef’s knife. You will be trimming the lettuce head to fit inside the container.
Take your head of lettuce and judge as best you can how many heads you need to fill the container. A 4″ continuer will usually only use one head of lettuce, but this may vary depending on the actual size of the heads. If they’re small, use two and line them up so the tops of the heads are as level as possible. It’s tough, lettuce is not exactly ‘perfect’ at the leafy end, just do your best and remember you’ll be trimming it later. Laying the container on top of the lettuce momentarily, measure approximately the length you should cut then put container aside. You’ll want to see the leaves about an inch or two longer than the container itself. Cut the head at the root end and dispose of root. Gather the now cut head or leaves and insert the cut ends into the container, pushing it all the way in as far as it will go, tucking the longer ends if necessary. You should now have a container or basket that looks ‘grassy’ on top. If the lettuce is too long, rip the excess back, tearing the leaves off until it’s trimmed to the desired length. You can wait to do this after the arrangement is done if you prefer, but it’s easier to do when the pot is still empty. Your fingers should not be able to slide too easily down and into the leaves, but you don’t want it packed too tightly either. It needs to be dense enough to hold up the skewers with the fruit on them. Put the filled container into the fridge temporarily or to the side while you cut the fruit.
CUTTING THE FRUIT This assumes you are using a 4″ container or basket and will serve about 8 to 10, maybe more in a buffet situation. Larger size containers will require larger quantities.
Honeydew & Cantaloupe – On lg. cutting board cut melon in half. You’ll only need 1/4 or 1/2 of the melon, so put one of the halves to the side. Remove seeds and pulp. Melon sizes vary so cut each melon into wedges to your preferred size. For a large honeydew you can cut it lengthwise in half again, then in half again and once more, leaving you with four ‘half moon’ shape pieces per quarter melon. Now cut these 4 pieces across to make 8 pieces. Remove carefully from peel, discard peels. Cantaloups are smaller and will only yield 6 pieces per quarter melon. Put aside.
Melon Balls While you have the cantaloupe, get your baller and make as many balls as you need to top the pineapple flowers. 4 to 5 balls should be enough. You can forgo the melon balls entirely if you want and top the pineapple flowers with small strawberries.
 Apples You will need the bowl, pineapple juice, a chef’s knife and a paring knife for this step. Slice in half along length of core, dunk cut side of one half into juice and put aside or store, you may not need this half at all. Place apple cut side down on cutting board and cut in half again. Take each quarter and slice into three wedges, then placing wedges on sides trim out the core in a semi-circular cut from top to bottom. Once cores are gone immerse the wedges into the pineapple juice making sure that they are fully coated. The acid in the juice delays the apple from getting brown too fast and will give you about 24 hrs before they look unappetizing. Put aside. Do the same with pears if you’re using them, remove cores and coat in juice.
Oranges Cut oranges similar to the apples, 6 wedges per half an orange but it is unnecessary to dip them in the juice. They’re acidic enough on their own. Again, you only need half of the orange, store the other half.
Pineapple You will need the large & small cutting boards, chef’s knife, the cookie cutter and maybe the paring knife. Do not remove the top of the pineapple and do not peel it either. You can use the top to help control it while you cut and a peeled pineapple is IMPOSSIBLE to work with, not to mention it’s just unnecessary. Use chef’s knife to slice across the pineapple starting at the bottom and removing the root, discard this piece. Cut the pineapple into approximately 1″ thick discs, trying as hard as possible to cut them evenly. For the 4″ container you only need 4 to 5 pieces. Put the remainder of the pineapple aside. Put one of the pineapple discs on the lg. cutting board and position the cookie cutter in the center of the pineapple, then put the small cutting board on top of the cookie cutter and with all your strength, push down on it as fast and as cleanly as possible in a guillotine fashion. Remove the cutting board and remove the flower and the cutter. Some pineapple is more fibrous, so you may need to use the paring knife to trim off stray threads so the flower looks sharp and clean, not hairy. Repeat with the rest of the pineapple. Put aside.
Strawberries If you are making this the same day you are serving it, then go ahead and clean the strawberries any way you want. But if you are not using this arrangement immediately, and I mean within a couple of hours, then it is recommended that you DO NOT IMMERSE THE STRAWBERRIES IN WATER. Moisture causes berries to rapidly degenerate. It’s not a problem when you are going to consume them quickly, but it is a problem if you expect them to sit in the refrigerator for a day or two. You don’t want to unveil your work of art in the center of your buffet, only to have the strawberries look droopy and soft. Using a clean moistened washcloth, preferable also soaked in the same sanitizing solution noted above for the melons and wrung nearly dry, gently wipe the exterior of ten or twelve of the strawberries to remove surface dirts and the excess petals that sometimes cling to the stems. Put aside.
Grapes Take 4 to 5 of the 10″ or 12″ skewers and thread 5 or 6 grapes on each (depending on size). Careful not to allow the skewer to show through the top grape. Put aside.
Other Fruits Similar to methods noted above, cut any other types of fruit you are using into wedges. Kiwi’s can be similarly to the pineapple, except obviously in much narrower slices, maybe a half inch or so but thick enough to stay on the skewer without drooping over. If you have a small flower shape cookie cutter, you can cut the kiwi into flowers too.
 ASSEMBLY OF THE ARRANGEMENT Finally! You are ready to put this sucker together! Get your container of lettuce, your 6″ & 8″ skewers and begin inserting the 6″ skewers into the apples. Position the apple so that skewer is inserted into the thickest, or heaviest part of the apple. It helps to give the appearance of ‘leaves’. There are 6 cps. of apple, 4 of them should have 6″ skewers and 2 of them should have 8″ ones. Move on and do the same with the 6 cps. of orange, honeydew and cantaloupe.
Begin with the melons. Start with a ‘dew on one of the shorter, 6″ skewers and insert it along the container edge into the lettuce pointing outward. Put an orange next to that (use only the shorter 6″ skewer on the outer perimeter, longer skewers are for the center), then a strawberry, and an apple, then a ‘lope, another berry… alternating them all the way around the outer edge and all of them facing outward. When filled you should have a ‘ring’ of fruit. Now prep the pineapple by taking one of the 10″ skewers and inserting it dead center into the middle of each flower, allowing the skewer to project through the other side at least 3/4″ or so. Trim the end of the skewer about 1/2 to 3/4″ (yes, it makes a difference) and then loosely position the flowers equally around the container, just above the ‘ring’ already there. Don’t tighten it too much, leave loose so you have room to put the other fruit in. Fill in the center and all of the voids with the remaining fruit, heavier stuff first, leaving the strawberries and grapes for last. Before inserting the strawberries or grapes, push the pineapple flowers gently further down and into the arrangement, not squeezing too much. Then go around and insert 6 or so of the 8″ skewers, empty, into the remaining ‘holes’ left between the other pieces then go around and stick the strawberries onto these, making sure you don’t leave any empty’s behind. Insert the grape sticks and put the melon balls (or mini-strawberries) onto the flowers… and you are done!
 Detailing – Often the strawberries will get ‘fibers’ or seeds all over the other fruits making it look unappetizing and ‘hairy’. These can be removed by taking a skewer and using the side of one of the points, gently removing them and ‘cleaning’ you beautiful arrangement, making it ready for you to serve to your guests or wrap up as a gift.
READ ME!! Keep refrigerated at all times before serving at a temperature of around 41 to 45 degrees, do not allow to freeze. Melons, as noted above, should not be consumed if the arrangement is allowed to sit at room temperature for more than two hours, the other fruits are not an issue as far as the health department is concerned and can be served at any temperature. Skewers are sharp and can cause splinters. Each person making their own fruit creation is expected to make sure that it is handled responsibly and do not allow children to eat from the skewer or use it to play ‘pirates’ with. Remove exposed skewers from the arrangement as quickly as possible once fruit is consumed and dispose of accordingly.
Now, you may be wondering just why would someone who’s business it is to sell these wonderful, creative and delicious edible arrangements give these instructions to everyone, allowing them to do it themselves? I look at it like changing your oil. Everyone CAN do it themselves, but how many of us really WANT to? For some, these instructions may help you create affordable and impressive gifts and centerpieces you can make yourself for years and years to come. For others, they’ll try it once and swear NEVER again! I’m counting on the latter.
Have fun and if you have questions just e-mail me at info@crazeedaisee.com.
Natalie, Fruitista-at-Large, Crazee Daisee Edible Creations, Doylestown, PA, Bucks County
WWW.CRAZEEDAISEE.COM
See us on our You Tube channel!